以“為博客增加訂閱功能”為例,來介紹用ajax提交表單的方法。
前端html5+js
<div class="container" style="margin-top:3em;margin-bottom:1em;">
<div class="text-center" style="font-size:1.2em;margin-top:0.5em;margin-bottom:0.5em;">歡迎使用ExASIC訂閱服務</div>
<form>
<div class="form-group">
<input type="email" class="form-control" id="exampleInputEmail1" aria-describedby="emailHelp" placeholder="輸入電子郵箱">
<small id="emailHelp" class="form-text text-muted">僅用于ExASIC最新文章通知,方便及時閱讀。</small>
</div>
<div>
<div class="form-check form-check-inline">
<input class="form-check-input" type="radio" name="inlineRadioOptions" id="inlineRadio1" value="1" checked="checked">
<label class="form-check-label" for="inlineRadio1">訂閱</label>
</div>
<div class="form-check form-check-inline">
<input class="form-check-input" type="radio" name="inlineRadioOptions" id="inlineRadio2" value="2">
<label class="form-check-label" for="inlineRadio2">退訂</label>
</div>
</div>
<button type="button" class="btn btn-primary" onclick="submit_email()">提交</button>
</form>
</div>
button的類型是button,而不是submit,這樣我們就可以調用自定義js函數submit_email()向后臺提交email。
function submit_email(){
var email = document.getElementById("exampleInputEmail1").value;
var type_r1 = document.getElementById("inlineRadio1");
var type_r2 = document.getElementById("inlineRadio2");
var type;
if(type_r1.checked){
type = type_r1.value;
}else{
type = type_r2.value;
}
//check email rule
if(email.length > 150){
alert("請輸入正確的郵箱格式");
return;
}
pat = /^[a-zA-Z0-9._\-]{3,100}@[a-zA-Z0-9._\-]+\.(com|cn|net|top|fun|org|tech|ren|dev|jp|us|au)$/;
if(pat.test(email) == false){
alert("請輸入正確的郵箱格式");
return;
}
//ajax: ie7+, firefox, chrome, opera, safari (not support ie5, ie6)
var xmlhttp;
if(window.XMLHttpRequest){
xmlhttp = new XMLHttpRequest();
xmlhttp.onreadystatechange = function(){
if(xmlhttp.readyState==4 && xmlhttp.status==200){
alert(xmlhttp.responseText); //display success or failure
}
}
xmlhttp.open("POST", "subscribe.php", true);
xmlhttp.setRequestHeader("Content-type","application/x-www-form-urlencoded");
var arg = "email=" + email + "&type=" + type;
xmlhttp.send(arg);
} //end of if(window...
}
在submit_email()函數開頭,先用getElementById().value獲取用戶的email和type。再用js正則來檢查email是否符合電子郵箱的命名規則。然后用ajax方式向后臺提交POST請求,把email和type發送給php服務器。最后按照php服務器的回復xmlhttp.responseText來顯示訂閱的結果。
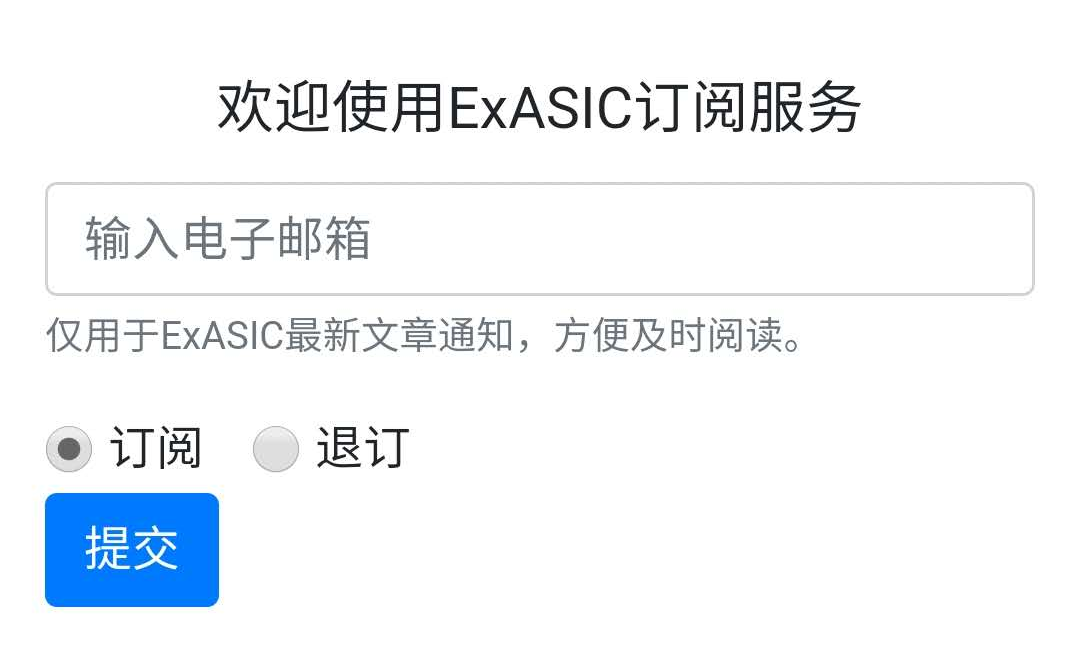
效果如下:
后端php+mysql
<?php
$email = $_POST['email'];
$type = $_POST['type'];
//
//connect to database
//
$mysql_svr_name = "mysql_server";
$mysql_db_name = "db_name";
$mysql_db_user = "user";
$mysql_db_pwd = "pwd";
$conn = mysql_connect($mysql_svr_name, $mysql_db_user, $mysql_db_pwd);
if(!$conn){ die(mysql_error()); }
mysql_select_db($mysql_db_name, $conn);
mysql_query('set names utf8');
//query
$sql = "SELECT count(*) as total FROM `email` WHERE `email` = '" . $email . "' LIMIT 1";
$res_tmp = mysql_query($sql, $conn);
$res_row = mysql_fetch_array($res_tmp);
$count = $res_row['total'];
if($count == 0 && $type == 2){
echo "您要退訂電子郵箱不存在";
}else if($count == 1 && $type == 1){
echo "您已經成功訂閱ExASIC";
}else if($count == 0 && $type == 1){ //add
$sql = "INSERT INTO `email` (`email`) VALUES ('";
$sql .= $email;
$sql .= "')";
$res_tmp = mysql_query($sql, $conn);
if(mysql_affected_rows() == 1){
echo "恭喜,您已成功訂閱ExASIC";
}else{
echo "內部錯誤,請稍后再試";
}
}else if($count == 1 && $type == 2){ //delete
$sql = "DELETE FROM `email` WHERE `email` = '" . $email . "'";
$res_tmp = mysql_query($sql, $conn);
if(mysql_affected_rows() == 1){
echo "您已成功退訂ExASIC";
}else{
echo "內部錯誤,請稍后再試";
}
}else{
echo "內部錯誤,請稍后再試";
}
?>
先從$_POST[""]中用獲得email和type,再查詢數據庫中是否已經存在記錄。再根據實際情況進行增刪操作。最后echo "msg",返回給前端。
總結
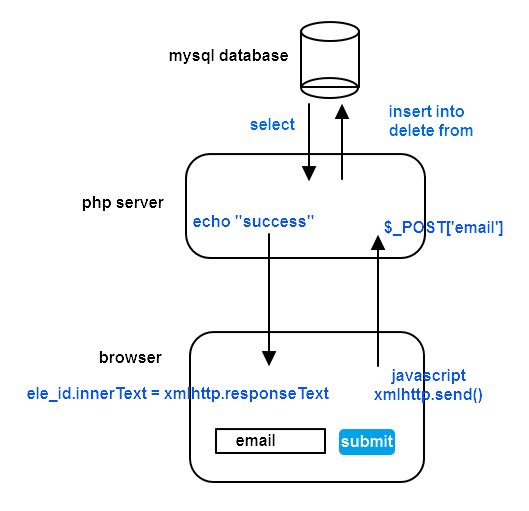
本文介紹了ajax的使用方法,并詳細介紹了為博客增加訂閱功能的實現過程。下面畫出了代碼的示意圖,方便理解ajax。
本站文章版權歸原作者及原出處所有 。內容為作者個人觀點, 并不代表本站贊同其觀點和對其真實性負責,本站只提供參考并不構成任何投資及應用建議。本站是一個個人學習交流的平臺,網站上部分文章為轉載,并不用于任何商業目的,我們已經盡可能的對作者和來源進行了通告,但是能力有限或疏忽,造成漏登,請及時聯系我們,我們將根據著作權人的要求,立即更正或者刪除有關內容。本站擁有對此聲明的最終解釋權。