自定義組件,因為小程序是 MVVM 是數據驅動,所以,把所有的控制流程、動態流程的數據(即自變量)都交給組件的調用方,隨著調用方 setData 使元數據改變來驅動控制流程、動態流程(因變量)的變化,如 Dialog的顯示和隱藏是因變量,而控制 Dialog 的顯示狀態的量則是因變量。
類似于頁面,一個自定義組件由json wxml wxss js 4個文件組成。
自定義組件
1、 json 文件配置
要編寫一個自定義組件,首先需要在 json 文件中進行自定義組件聲明:
{
  "component": true,
  "usingComponents": {} }
2、wxml 模板
還要在 wxml 文件中編寫組件模版:
<view class='wx_dialog_container' hidden="{{!isShown}}"> <view class='wx-mask'></view> <view class='wx-dialog'> <view class='wx-dialog-title'>{{ title }}</view> <view class='wx-dialog-content'>{{ content }}</view> <view class='wx-dialog-footer'> <view class='wx-dialog-btn' catchtap='_cancelEvent'>{{ cancelText }}</view> <view class='wx-dialog-btn' catchtap='_confirmEvent'>{{ confirmText }}</view> </view> </view> </view>
-
1
-
2
-
3
-
4
-
5
-
6
-
7
-
8
-
9
-
10
-
11
-
12
3、wxss 樣式
在 wxss 文件中加入組件樣式:
.wx-mask { position: fixed; z-index: 1000; top: 0; right: 0; left: 0; bottom: 0; background: rgba(0, 0, 0, 0.3); } .wx-dialog { position: fixed; z-index: 5000; width: 80%; max-width: 600rpx; top: 50%; left: 50%; -webkit-transform: translate(-50%, -50%); transform: translate(-50%, -50%); background-color: #fff; text-align: center; border-radius: 3px; overflow: hidden; } .wx-dialog-title { font-size: 18px; padding: 15px 15px 5px; } .wx-dialog-content { padding: 15px 15px 5px; min-height: 40px; font-size: 16px; line-height: 1.3; word-wrap: break-word; word-break: break-all; color: #999; } .wx-dialog-footer { display: flex; align-items: center; position: relative; line-height: 45px; font-size: 17px; } .wx-dialog-footer::before { content: ''; position: absolute; left: 0; top: 0; right: 0; height: 1px; border-top: 1px solid #d5d5d6; color: #d5d5d6; -webkit-transform-origin: 0 0; transform-origin: 0 0; -webkit-transform: scaleY(0.5); transform: scaleY(0.5); } .wx-dialog-btn { display: block; -webkit-flex: 1; flex: 1; -webkit-tap-highlight-color: rgba(0, 0, 0, 0); position: relative; } .wx-dialog-footer .wx-dialog-btn:nth-of-type(1) { color: #353535; } .wx-dialog-footer .wx-dialog-btn:nth-of-type(2) { color: #3cc51f; } .wx-dialog-footer .wx-dialog-btn:nth-of-type(2):after { content: " "; position: absolute; left: 0; top: 0; width: 1px; bottom: 0; border-left: 1px solid #d5d5d6; color: #d5d5d6; -webkit-transform-origin: 0 0; transform-origin: 0 0; -webkit-transform: scaleX(0.5); transform: scaleX(0.5); }
-
1
-
2
-
3
-
4
-
5
-
6
-
7
-
8
-
9
-
10
-
11
-
12
-
13
-
14
-
15
-
16
-
17
-
18
-
19
-
20
-
21
-
22
-
23
-
24
-
25
-
26
-
27
-
28
-
29
-
30
-
31
-
32
-
33
-
34
-
35
-
36
-
37
-
38
-
39
-
40
-
41
-
42
-
43
-
44
-
45
-
46
-
47
-
48
-
49
-
50
-
51
-
52
-
53
-
54
-
55
-
56
-
57
-
58
-
59
-
60
-
61
-
62
-
63
-
64
-
65
-
66
-
67
-
68
-
69
-
70
-
71
-
72
-
73
-
74
-
75
-
76
-
77
-
78
-
79
-
80
-
81
-
82
-
83
-
84
-
85
-
86
-
87
-
88
-
89
-
90
-
91
-
92
-
93
-
94
-
95
-
96
4、js 控制
在自定義組件的js文件中,需要使用 Component() 來注冊組件,并提供組件的屬性定義、內部數據和自定義方法。組件的屬性值和內部數據將被用于組件 wxml 的渲染,其中,屬性值是可由組件外部傳入的。
Component({
options: {
multipleSlots: true }, /**
* 組件的屬性列表
*/ properties: { title: { type: String, value: '標題' }, content: { type: String,
value: '彈窗內容' }, cancelText: { type: String,
value: '取消' }, confirmText: { type: String,
value: '確定' }, isShown: { type: Boolean,
value: false }
}, /**
* 私有數據,組件的初始數據
* 組件的初始數據
*/ data: { }, /**
* 組件的方法列表
*
*/ methods: { _cancelEvent() { this.triggerEvent("cancelEvent")
},
_confirmEvent() { this.triggerEvent("confirmEvent"); }
}
})
-
1
-
2
-
3
-
4
-
5
-
6
-
7
-
8
-
9
-
10
-
11
-
12
-
13
-
14
-
15
-
16
-
17
-
18
-
19
-
20
-
21
-
22
-
23
-
24
-
25
-
26
-
27
-
28
-
29
-
30
-
31
-
32
-
33
-
34
-
35
-
36
-
37
-
38
-
39
-
40
-
41
-
42
-
43
-
44
-
45
-
46
-
47
-
48
-
49
-
50
-
51
-
52
-
53
-
54
-
55
-
56
-
57
-
58
-
59
-
60
-
61
-
62
-
63
-
64
-
65
-
66
-
67
調用
1、json文件配置
使用已注冊的自定義組件前,首先要在頁面的 json 文件中進行引用聲明。此時需要提供每個自定義組件的標簽名和對應的自定義組件文件路徑:
"usingComponents": { "dialog": "../../../components/dialog/dialog" }
2、wxml 中引用
在頁面的 wxml 中就可以像使用基礎組件一樣使用自定義組件。節點名即自定義組件的標簽名,節點屬性即傳遞給組件的屬性值。
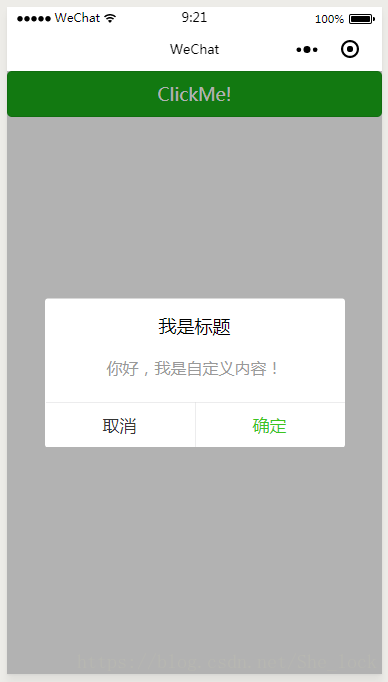
<dialog id='dialog' title='我是標題' content='你好,我是自定義內容!' cancelText='取消' confirm='確定' isShown="{{isShown}}" bind:cancelEvent="_cancelEvent" bind:confirmEvent="_confirmEvent"/>
3 、js控制
js 文件中需要聲明Data,以及觸發的函數。
data: {
isShown: false },
_cancelEvent(e) {
console.log('你點擊了取消'); this.setData({
isShown: false })
},
_confirmEvent(e) {
console.log('你點擊了確定'); this.setData({
isShown: false })
}
-
1
-
2
-
3
-
4
-
5
-
6
-
7
-
8
-
9
-
10
-
11
-
12
-
13
-
14
-
15
-
16
-
17
-
18
-
19
-
20
初始觸發顯示:
 <button type="primary" bindtap="showDialog"> ClickMe! </button>

    showDialog() {
        this.setData({
            isShown: true })
    }
效果
本站文章版權歸原作者及原出處所有 。內容為作者個人觀點, 并不代表本站贊同其觀點和對其真實性負責,本站只提供參考并不構成任何投資及應用建議。本站是一個個人學習交流的平臺,網站上部分文章為轉載,并不用于任何商業目的,我們已經盡可能的對作者和來源進行了通告,但是能力有限或疏忽,造成漏登,請及時聯系我們,我們將根據著作權人的要求,立即更正或者刪除有關內容。本站擁有對此聲明的最終解釋權。